Last Updated on May 23, 2025
In modern software development, and increasingly in data-driven fields like economics and data science, Git is a fundamental tool. It’s a Distributed Version Control System (DVCS) that helps individuals and teams manage project history, track changes, and collaborate effectively. Unlike older systems, Git gives every user a full copy of the project history locally, allowing for offline work and safe experimentation using branches.
While working locally is efficient, collaboration requires sharing your changes. This is done through remote repositories, often hosted on platforms like GitHub or GitLab, which act as central hubs. The command that connects your local work to these shared hubs is git push. It’s how you upload your local contributions, making them available to your team or collaborators. Understanding git push is essential for anyone working in a collaborative environment, whether on code, analysis scripts, or reports.

Understanding git push: Uploading Your Contributions
The git push command transfers commits (snapshots of your project’s state) from your local repository to a remote one. It’s the “upload” step in the typical Git workflow:
- Modify files locally.
- Stage changes (git add) to select what goes into the next snapshot.
- Commit changes (git commit -m “message”) to save the snapshot locally.
- Push commits (git push) to upload them to the remote repository.
git push sends the commit history, not just individual files. It’s part of Git’s synchronization toolkit, alongside git fetch and git pull (which download changes).
Basic Usage: Sending Code Upstream
The basic syntax is:
git push <remote> <branch> - <remote>: The shortname for the remote repository (commonly origin).
- <branch>: The name of the local branch to push.
Common Examples:
- Pushing the main branch:
- If you cloned an empty repo and made your first commit locally, your first push will set the upstream:
git push -u origin main 
If you cloned a repo that already had a main branch and you’ve made new commits locally:
git push origin main 
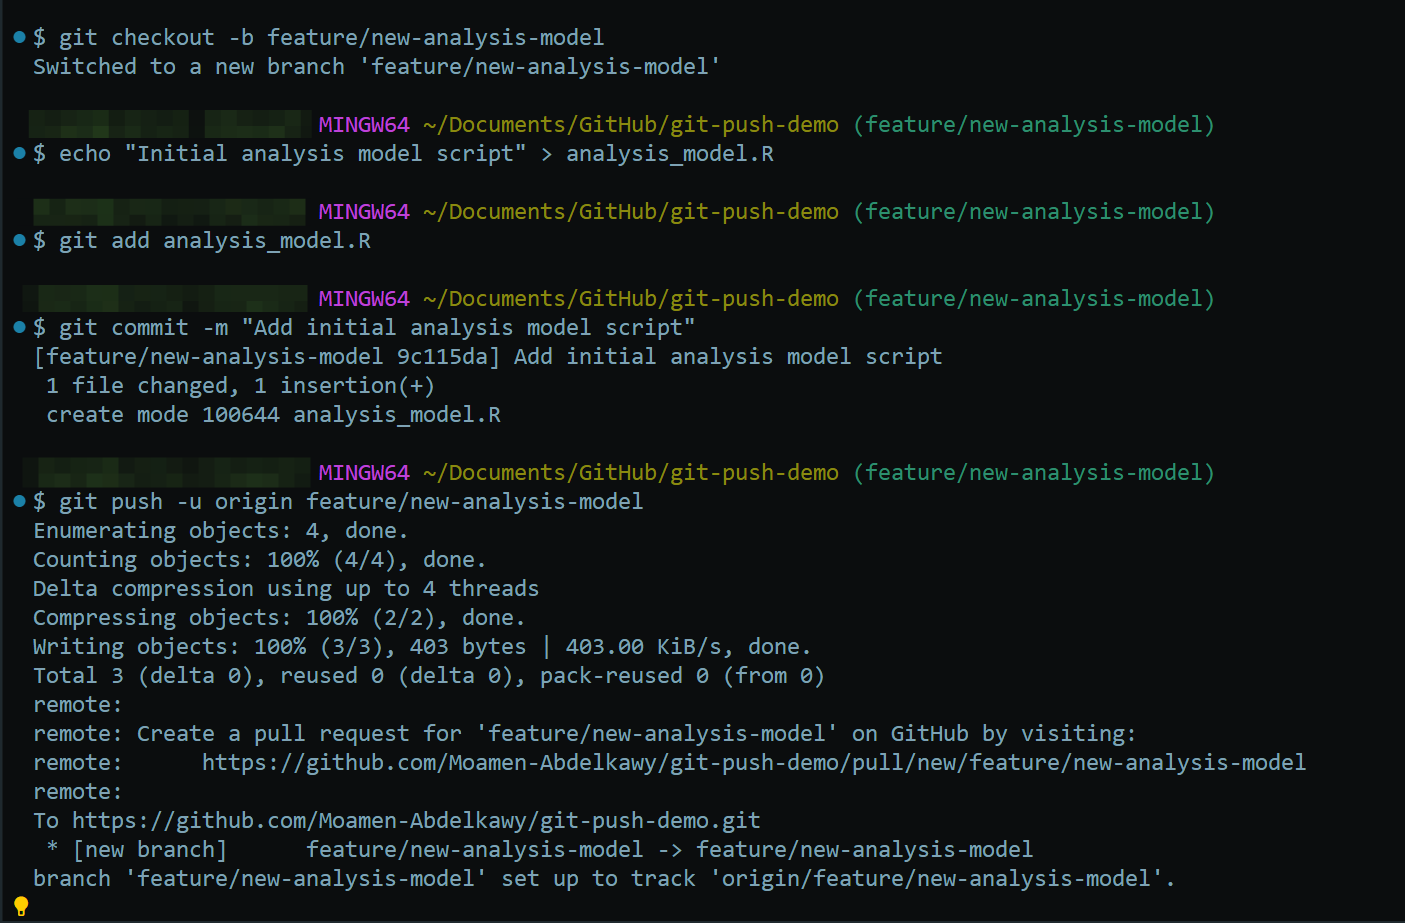
- Pushing a feature branch:
git push origin feature/new-analysis-model
This shares your work on a specific feature or task.
- Pushing to a differently named remote branch:
git push origin local-feature:remote-feature-name
This pushes your local-feature branch to a branch named remote-feature-name on origin.
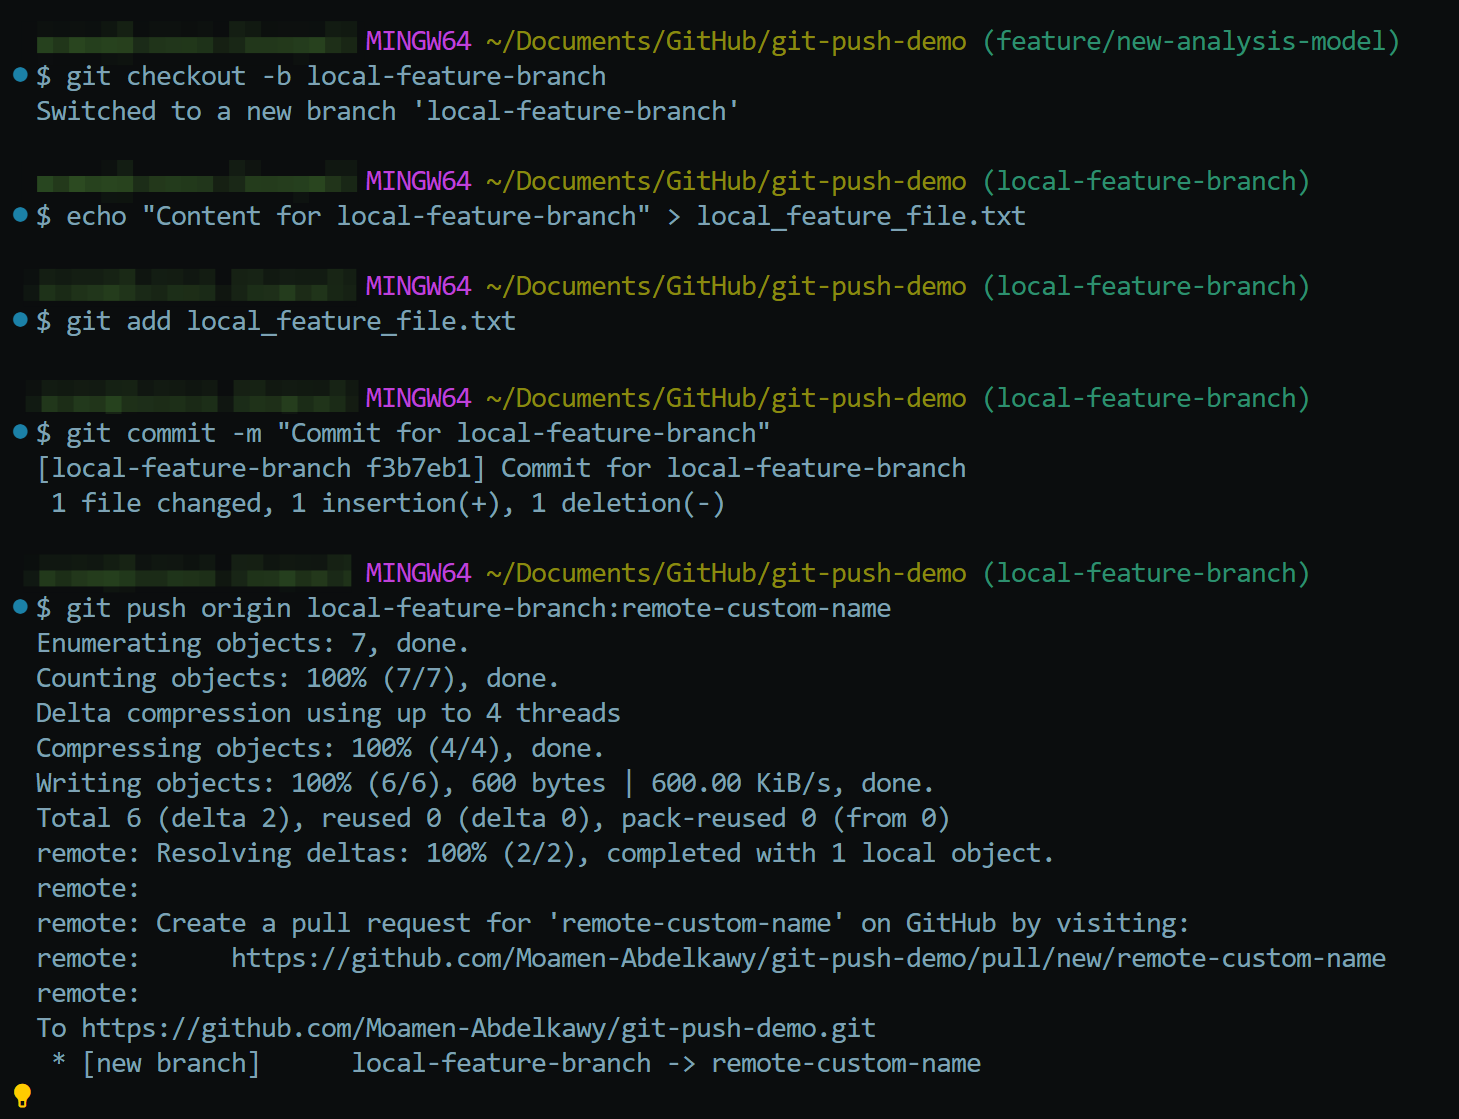
Being explicit with the remote and branch name is often clearer than relying on defaults.
Working with Remote Repositories: Connecting to Collaborators
Remotes are named references to the URLs of other repositories. git clone automatically sets up origin. You can manage remotes using commands like:
- git remote -v: List remotes and their URLs.

- git remote add <name> <url>: Add a new remote connection (e.g., adding an upstream remote for a forked project).

- git remote remove <name>: Remove a remote connection.

Upstream Branches:
A local branch can “track” a remote branch, known as its upstream branch. This simplifies pushing and pulling. The -u (or –set-upstream) flag establishes this link on the first push:
git push -u origin feature/new-login This pushes the branch and sets up tracking. Once set, you can often just use git push or git pull, and git status will show if your branch is ahead or behind its upstream counterpart.
Common Pitfalls and Errors: Navigating the Bumps
Interacting with remote repositories via git push can sometimes lead to errors. Many of these are actually safety mechanisms designed to protect your project’s integrity. Let’s explore some common issues and how to resolve them:
Permission Denied / Authentication Failed: This error means the remote server has rejected your attempt to connect and push changes.
Possible Causes:
- SSH Key Issues: Your SSH key might not be set up correctly on your local machine, the SSH agent might not be running, or the public key might not be registered with the remote host (like GitHub or GitLab).
- Incorrect Remote URL: The URL for the remote repository (origin or another name) might be wrong.
- HTTPS Credential Problems: If you’re using HTTPS, your username or Personal Access Token (PAT) might be incorrect or expired.
- Insufficient Repository Permissions: You might not have the necessary write access to the repository you’re trying to push to.
Troubleshooting Steps:
- Verify SSH Keys: Check if your SSH agent is running and if your keys are added (ssh-add -l). Ensure your public key is correctly added to your account on the remote hosting platform.
- Check Remote URL: Use git remote -v to list your remotes and confirm the URL is accurate.
- Update HTTPS Credentials: If using HTTPS, ensure your username and PAT are current. You might need to update them in your system’s credential manager.
- Confirm Repository Permissions: Check with the repository administrator to ensure you have push permissions.
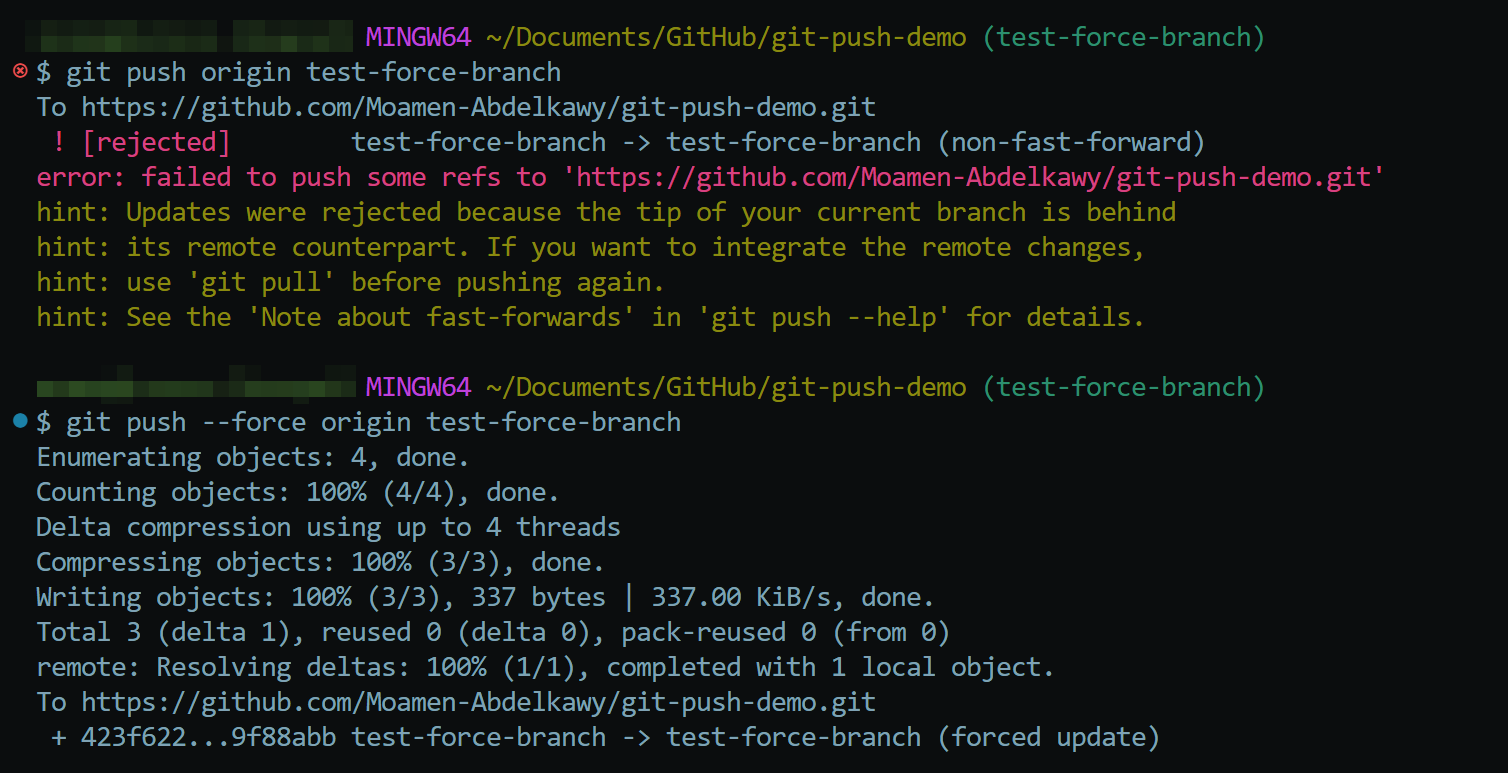
Non-Fast-Forward Updates Were Rejected: This error occurs when the remote branch has new commits that your local branch doesn’t yet have. Essentially, the project history on the remote has moved forward since you last synchronized, and Git prevents your push to avoid overwriting those new remote commits.
Common Cause: Another collaborator has pushed their changes to the same branch after your last git pull or git fetch.
Troubleshooting Steps (The Safe Way):
- Fetch Remote Changes: Download the latest changes from the remote without immediately trying to merge them: git fetch origin (replace origin with your remote name if different).
- Merge or Rebase: Integrate the fetched remote changes into your local branch.
Merge: git merge origin/main (replace main with your branch name). This creates a merge commit.
Rebase (Alternative): git rebase origin/main. This reapplies your local commits on top of the remote changes, resulting in a linear history. Use with caution if the branch is shared and others might have based work on your previous commits.
- Resolve Conflicts (If Any): If Git reports merge conflicts, you’ll need to open the affected files, manually resolve the differences, save the files, git add them, and then complete the merge/rebase (e.g., git commit for a merge, or git rebase –continue for a rebase).
- Push Again: Once your local branch incorporates the remote changes (and any conflicts are resolved), you should be able to push successfully: git push origin main.
Quick Sync (Alternative): You can also use git pull origin main. This command is a shorthand for git fetch origin main followed by git merge origin/main (or git rebase origin/main if configured). While convenient, understanding the separate fetch and merge/rebase steps is beneficial for troubleshooting.
- Merge Conflicts Preventing Push: If, during the git pull or git merge step (as described above), you encounter merge conflicts, Git will pause the process. You cannot push until these conflicts are resolved locally.
Troubleshooting Steps:
- Identify Conflicted Files: Git will list the files with conflicts.
- Edit Conflicted Files: Open each conflicted file. You’ll see markers like <<<<<<< HEAD, =======, and >>>>>>> branch-name indicating the conflicting sections. Carefully edit the file to incorporate the desired changes and remove these markers.
- Stage Resolved Files: After resolving the conflicts in a file, stage it using git add <filename>.
- Commit the Merge: Once all conflicts are resolved and staged, commit the merge: git commit. Git often provides a default merge commit message that you can use or edit.
- Push: Now, you should be able to push your changes.
A Git Story: The True Cost of a Hasty Push
As an economist working in the maritime sector, I frequently use Python for complex financial data analysis. Once, while refining a critical fuel optimization model, I pushed a feature branch with a commit history that reflected my raw thought process: “algo tweak,” “fix attempt,” “revert,” “final_maybe.”
A colleague from another team, needing to integrate a cost-reporting module based on my model, spent a significant part of their morning trying to navigate these ambiguous commits to find the definitive logic. This delay risked impacting a crucial weekly cost forecast.
That day reinforced a key lesson: regardless of experience or deadlines, taking a few extra minutes to ensure a clean, understandable commit history before a git push is essential. It’s fundamental for effective collaboration, project velocity, and the integrity of our analyses.
Advanced Use Cases: Beyond the Basics
git push has more advanced options:
- Force Pushing (–force and –force-with-lease): Overwrites remote history.
- –force (-f): Unconditionally replaces the remote branch with your local one. Extremely risky on shared branches as it can delete others’ work without warning. Use primarily after rewriting history on a private branch before sharing.
- –force-with-lease: Safer. It checks if the remote branch has changed since your last fetch. If it has (meaning someone else pushed), the force push fails, preventing accidental overwrites of unseen work. Strongly preferred over –force if overwriting is necessary on potentially shared branches.
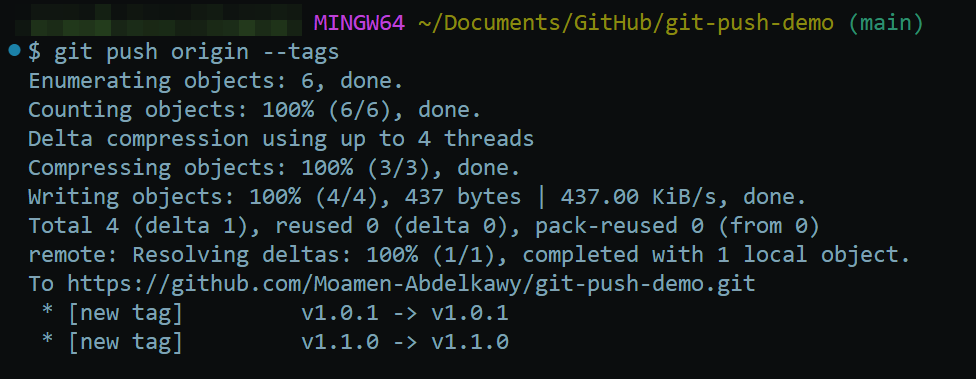
- Pushing Tags: Tags (like v1.0) mark specific points (e.g., releases). git push doesn’t push tags by default.
- Push a single tag: git push origin v1.0.0


- Push all tags: git push origin –tags (use with care if you have many local-only tags).
- Push annotated tags along with commits: git push –follow-tags

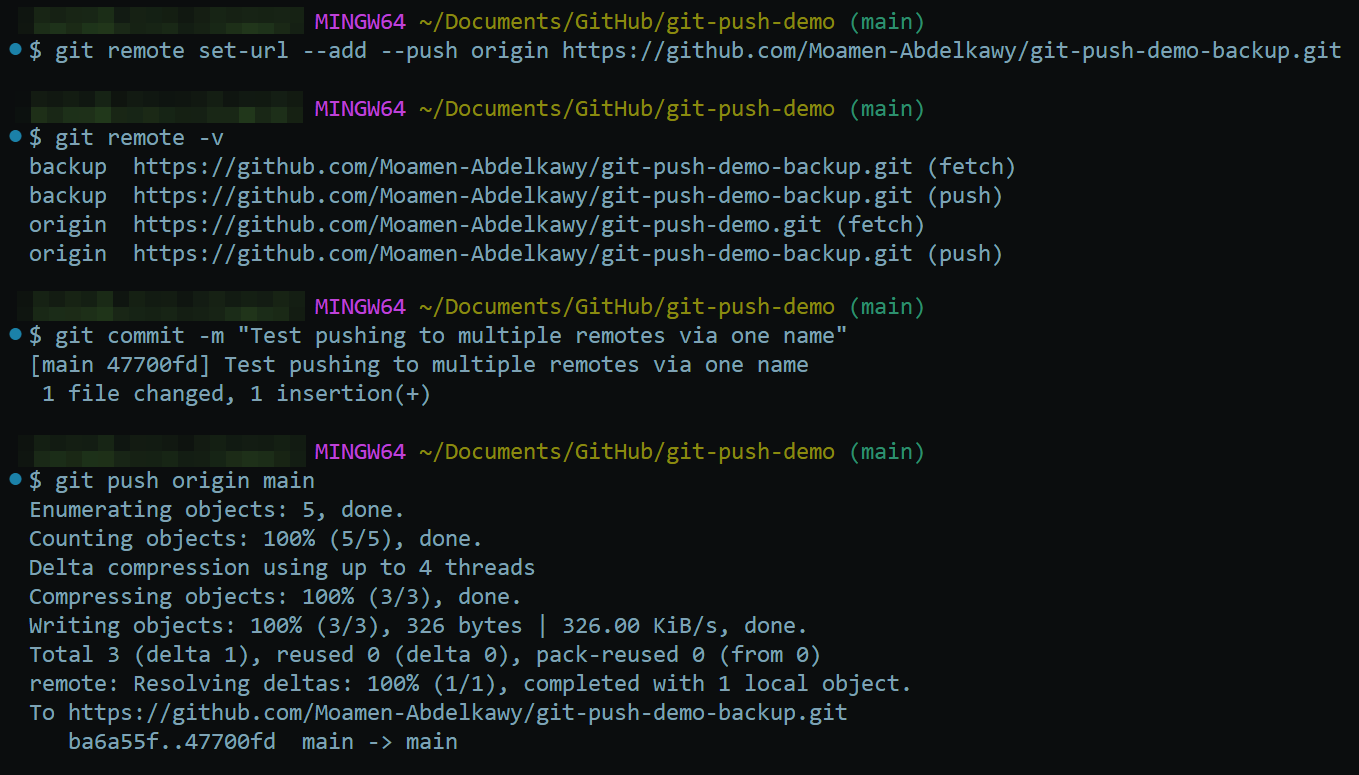
- Pushing to Multiple Remotes: Useful for backups or mirroring.
- Method 1: Push to each remote separately (git push origin main, git push backup main).

- Method 2: Configure multiple push URLs for one remote name using git remote set-url –add –push <remote-name> <url>. Then, a single git push <remote-name> main pushes to all configured URLs.
Conclusion: Pushing Forward with Best Practices
git push is vital for collaboration. Using it effectively involves understanding its role and potential impact. Best practices include:
- Pull Before Pushing: Sync local with remote changes first (git pull or git fetch + git merge) to avoid non-fast-forward errors.
- Use Feature Branches: Develop on separate branches and push those, merging via pull requests rather than pushing directly to main.
- Push Frequently (on Feature Branches): Back up work and allow early visibility, but ensure pushed code is reasonably stable.
- Write Clear Commit Messages: Make the history understandable.
- Set Upstream Tracking (-u): Simplify future pushes/pulls on the first push of a branch.
- Avoid –force on Shared Branches: Prefer –force-with-lease and communicate clearly if history rewriting is needed.
- Never Push Sensitive Data: Use .gitignore and clean history immediately if accidents happen.
- Clean Local History Before Sharing (Optional): Use tools like interactive rebase (git rebase -i) on local, unshared branches to create a clearer history before the initial push.
By following these practices, you can use git push effectively to collaborate smoothly and maintain clean, reliable project histories. Always consult the Official Git Documentation when in doubt. To continue your programming journey, be sure to check out Udacity’s School of Programming, and other related courses.