Last Updated on May 30, 2025
In the dynamic world of computer vision, object detection stands as a cornerstone technology, enabling machines to “see” and identify objects within images and video. From self-driving cars recognizing pedestrians to security systems flagging suspicious activity, real-time object detection is crucial. For years, one name has consistently dominated this space: YOLO (You Only Look Once).

YOLO revolutionized object detection by reframing it as a single regression problem, directly predicting bounding boxes and class probabilities simultaneously. This approach drastically increased detection speed while maintaining impressive accuracy, making real-time applications truly feasible. This guide will walk you through the practical steps to get started with YOLOv5, a highly optimized and user-friendly version of this powerful algorithm, empowering you to build your own real-time object detection systems.
Overview
YOLOv5, developed by Ultralytics, is not just another iteration; it’s a family of composite models designed for various performance requirements, offering a sweet spot between speed, accuracy, and ease of use.
Features: YOLOv5 boasts features like mosaic data augmentation (combining four training images into one), automatic anchor box learning, and sophisticated architecture designs. It’s built for efficiency and simplicity, making it a favorite for both research and deployment.
Speed: One of its most significant advantages is its inference speed. YOLOv5 models can achieve lightning-fast detection rates, often processing dozens or even hundreds of frames per second on modern GPUs, making them ideal for real-time video analysis.
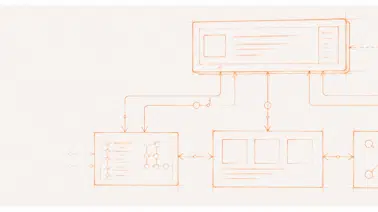
Architecture: At its core, YOLOv5 maintains the “You Only Look Once” philosophy. Its architecture typically consists of three main parts:
- Backbone: This extracts key features from the input image (e.g., CSPDarknet).
- Neck: This further processes the features, often using a Feature Pyramid Network (FPN) and Path Aggregation Network (PAN) to capture multi-scale information.
- Head: This performs the final detection, predicting bounding boxes and class probabilities at different scales.
Setting up the environment
Getting your environment ready for YOLOv5 is straightforward, thanks to its well-maintained repository. YOLOv5 is built upon a robust foundation of essential libraries. Its deep learning operations primarily leverage PyTorch as the backend, complemented by a suite of common scientific computing and image processing tools, including torchvision, opencv-python, numpy, pandas, and matplotlib.
Installation Steps:
- Clone the Repository: Open your terminal or command prompt and execute the following command to download the YOLOv5 source code:
git clone https://github.com/ultralytics/yolov5.git
- Navigate to the Directory: Change your current directory to the newly cloned yolov5 folder:
cd yolov5
- Install Dependencies: Install all the necessary Python packages listed in the requirements.txt file. This command will automatically install Pytorch, torchvision, opencv-python, and other crucial libraries:
pip install -r requirements.txt
Important Note: Ensure you have a suitable Python version installed on your system (e.g., Python 3.8-3.10 is generally recommended for compatibility with PyTorch and YOLOv5). If you plan to use a GPU for accelerated training and inference, ensure your PyTorch installation is configured for your specific CUDA version. Also, it would be better if you create a virtual environment for this setup.
Training with Custom Dataset
While YOLOv5 comes with powerful models pre-trained on vast datasets, but its true potential is unleashed when you fine-tune it on your own custom data. This process allows the model to learn to accurately detect the specific objects relevant to your project. For our example, we’ll use a Hardhat Workers dataset, focusing on identifying workers with and without safety helmets.
- Download the Dataset: Hardhat Workers dataset contains images of people with and without hardhats. It’s visually distinct, and the objects are typically well-defined. Download the dataset from kaggle and place it in your project directory.
Raw Image:

Classified Image:

- Choose the Training Configuration and Path: The most common issue that I face in fine-tuning a Yolo model is setting the path. You might get the following issues:

So you need to ensure that all the paths are correctly mentioned. First, open the data.yaml file, which you will get when you extract the file downloaded from the kaggle. This YAML file is the blueprint that guides YOLOv5 to your custom dataset, specifying where to find your images and what classes it should detect.

For this path, the dataset should be present in the prior to parent directory of the project.

Second, YOLOv5 offers different-sized models (yolov5s.yaml, yolov5m.yaml, yolov5l.yaml) located in the yolov5/models/ directory. For a small dataset and faster experimentation, yolov5s.yaml (the “small” model) is an excellent starting point.
- Running the Fine-Tuning process: Navigate to the root yolov5 (cd yolov5) directory in your terminal and execute the train.py script.
python3 train.py –img 640 –batch 16 –epochs 2 –data ../data.yaml –cfg models/yolov5s.yaml –weights yolov5s.pt –name my_custom_model
Let’s me break down these arguments for you:
- –img 640: Sets the input image size to 640×640 pixels during training. Larger images can capture more detail but require more GPU memory.
- –batch 16: Defines the batch size. Adjust this value based on your GPU’s memory; reduce it if you encounter “CUDA out of memory” errors.
- –epochs 2: Specifies the number of training iterations over the entire dataset. For custom datasets, more epochs are often needed than for fine-tuning on large general datasets. But I needed faster experimentation, so I set it to 2.
- –data ../data.yaml: Points to your custom data configuration file.
- –cfg models/yolov5s.yaml: Specifies the model architecture configuration file.
- –weights yolov5s.pt: Crucially, this tells the training script to start with pre-trained weights from a model trained on the massive COCO dataset. This significantly speeds up training and improves performance on your custom data through transfer learning. Ensure yolov5s.pt is in your yolov5 directory (it’s often downloaded automatically by the script if not present).
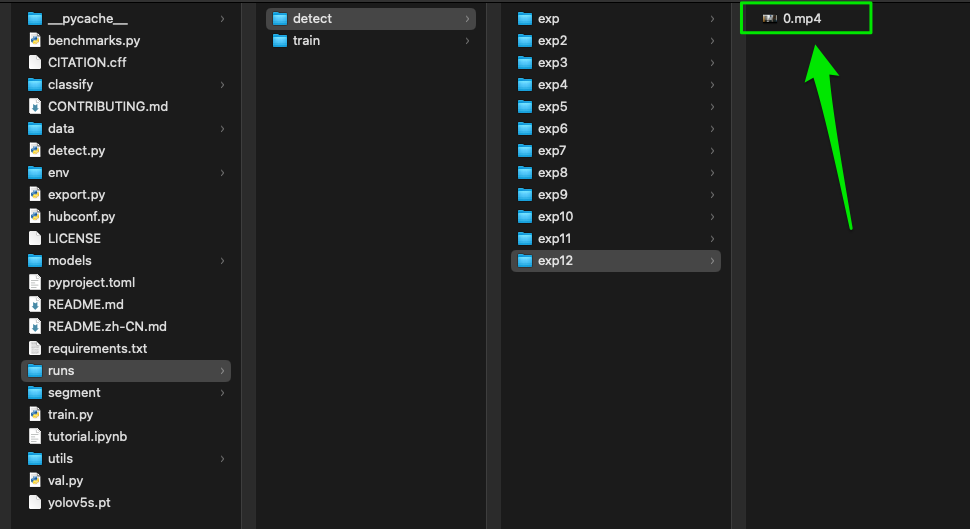
- –name my_custom_model: Assign a custom name to your training run. All training logs, metrics, and saved models will be stored in a directory like runs/train/my_custom_model.
Once you execute the script, you start getting these logs in the terminal.

Once training completes, your best-performing model weights will be saved, typically as best.pt within your run’s weights directory.

Realtime Inference Demo
After the training process, the most satisfying part is seeing your custom-trained YOLOv5 model perform real-time object detection! YOLOv5 makes inference incredibly user-friendly, allowing you to test your model on various sources with a single script.
The detect.py script, located in the root of your yolov5 directory, is your primary tool for running inference. It’s versatile enough to process images, video files, or even live streams from your webcam.
Code Walkthrough for real-time inference through webcam:
Let’s demonstrate real-time object detection using your computer’s webcam. This is a fantastic way to quickly visualize your model’s performance on live data.
python3 detect.py –weights runs/train/my_custom_model18/weights/best.pt –source 0
Let’s break down the key arguments:
- –weights runs/train/my_custom_model18/weights/best.pt: This crucial argument specifies the path to your trained model weights. After your custom training run (e.g., my_custom_model18), the best-performing weights will be saved here.
- –source 0: This tells the script to use your default webcam (usually the integrated one).
- For video files: Use –source /path/to/your/video.mp4
- For image files: Use –source /path/to/your/image.jpg
- For a directory of images: Use –source /path/to/your/image_folder/
- –conf 0.25: (Optional) This sets the confidence threshold. Only detections with a confidence score above 0.25 (or your chosen value) will be displayed. This helps filter out weak or spurious detections.
Upon executing the command, a new window will pop up, displaying your webcam feed with bounding boxes and class labels drawn around detected objects in real-time.

You’ll also see the inference speed (frames per second – FPS) displayed, vividly showcasing YOLOv5’s exceptional real-time capabilities. The results (images/videos with detections) will automatically be saved to the runs/detect/ directory.
Tips and Troubleshooting
- Dataset Organization: Getting your image and label files correctly structured (e.g., .txt files in the same folder as images, correct paths in data.yaml) is a common tripping point for beginners.
The solution is already discussed in the “Training with Custom Dataset” section.
- CERTIFICATE_VERIFY_FAILED Error: This error typically occurs when Python’s requests library (used by many packages, including potentially parts of Hugging Face or even PyTorch for downloading models/datasets) encounters issues verifying SSL certificates, often due to corporate firewalls, proxy settings, or outdated certificate stores.
A common approach is to add a few lines of code to explicitly handle or ignore SSL certificate issues, often by adjusting Python’s ssl context. A quick, but less secure, fix some users employ is to add these lines at the very top of your train.py or detect.py scripts (or any script making network requests):
import ssl
ssl._create_default_https_context = ssl._create_stdlib_context
Deployment Considerations
Once your YOLOv5 model is trained and performing well, the next step is often deployment, integrating it into a real-world application.
- Edge Devices: For applications requiring on-device inference (e.g., drones, embedded systems, mobile phones), YOLOv5 can be converted to optimized formats like ONNX, OpenVINO, or TensorRT. These formats allow for faster inference on specialized hardware or low-power devices. Ultralytics provides tools for export.
- Cloud: For scalable applications, you can deploy your YOLOv5 model on cloud platforms like AWS, Google Cloud, or Azure, often leveraging services like AWS SageMaker, Google Cloud AI Platform, or Azure ML. This allows for flexible scaling based on demand.
Continue your Journey
YOLOv5 truly lowers the barrier to entry for real-time object detection, empowering beginners and experienced practitioners alike to leverage the power of state-of-the-art models with remarkable ease. We encourage you to dive deeper into this exciting field. Experiment with loading different pre-trained YOLOv5 models, and most importantly, try fine-tuning them on your own custom datasets to tackle real-world computer vision challenges.
To effectively enhance your abilities and gain hands-on experience in this rapidly evolving domain, consider Udacity’s:
- Computer Vision Nanodegree program: This nanodegree program offers a deep dive into Computer Vision, starting with foundational concepts like object detection and image classification using PyTorch. You’ll progress to advanced topics, including recurrent neural networks and the YOLO algorithm for robust model training. Finally, master object tracking and localization, equipping you to build sophisticated computer vision applications.
- Self Driving Car Engineer Nanodegree Program: This Nanodegree program delves into Self-Driving Car engineering, covering core Computer Vision techniques like object detection and image classification. You’ll master Sensor Fusion, integrating data from cameras, lidar, and radar for robust perception. The program then advances to Localization and Planning, where you’ll learn to pinpoint a vehicle’s position and chart its safe, efficient path.
It will not only solidify your understanding of foundational AI concepts but also provide the practical skills needed to build and deploy advanced AI solutions, including those in computer vision.