Last Updated on October 23, 2024
In this introductory tutorial on HTML/CSS Span and Div, we will explore some easy to use, creative applications to further enhance the text and placement of text on your web page.
The Difference Between Span and Div
Span Element
The Span element is:
- An inline element.
- Used for in-line HTML formatting.
- Used for small chunks of HTML inside a line (such as inside a paragraph).
- Used to stylize texts.
Div Element
The Div (division) element is:
- A block-level element.
- Used to group larger chunks of code.
- Used to wrap sections of a document.
- Used while creating CSS based layouts in html.
HTML Span Etiquette
HTML is very temperamental and failure to follow any of the rules can result in the web content not displaying properly.
Remember the following when writing your HTML for the Span Element.
- Remember that for all HTML elements, you must open and close the element as in the following: <span style=”color:orange;”> text here </span>
- Additionally, each Style (or group of styles) you use within your Span Element needs to be wrapped in quotes.
- Also, make sure you use a semicolon to separate your Styles.
- Use a colon after the Style to determine the parameter of that Style.


Utilizing <Span> to Style Inline Text
The following code sample displays the inline Span Element. In this example, we can stylize any text we want. Instead of creating a variety of CSS styles, we simply add this element inline with the text anywhere we want and create text to display in virtually unlimited creative ways.
You may copy the code below to practice with:
| <!DOCTYPE html> <html> <body> <h1>The span element</h1> <p>Udacity will teach you how to use <span style=”color:blue;font-weight:bold;font-size:18pt;”> the Span element</span> in order to customize <span style=”color:orange;font-weight:bold;font-size:16pt;”> your web text </span>.</p> </body> </html> |
See the illustration below displaying the Span Element area:

The result from this HTML code on your web page is illustrated below:

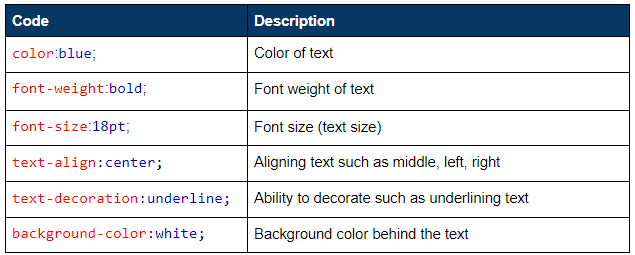
Inline HTML Span Element Text Style Options
The following is a list of some possible styles for you to play with:
The Div Element
Utilizing <div> to Wrap a Document Section
In the following HTML code, we will show how to display a block that clearly defines a separate section on the web page.
Notice how the HTML <div> simply wraps the text, and it is the CSS div that clearly defines all aspects of how the container will be displayed.

You may copy the code sample below and past it into a text editor such as Notepad and save the file as “divsample.html.” Open the file in your preferred browser.
| <!DOCTYPE html> <html> <head> <style> div { border: 6px outset orange; background-color: lightblue; text-align: center; } </style> </head> <body> <h1>The div element</h1> <div> <h2>This is a heading in a div element</h2> <p>This is some text in a div element.</p> </div> <p>This is some text outside the div element. <br>Notice how this text is separate and distinct from the block above.</p> </body> </html> |
The result from this HTML code on your web page is illustrated below:

Nesting with the Div Element
The div element can also be nested, a div within another. This yields a block within a defined block to look like this:

You may copy the code below and try it out yourself.
| <!DOCTYPE html> <html> <head> <style type=”text/css”> .parent { width: 200px; height:130; border-width: 3px; border-style:solid; border-color:orange; padding:10px; } .child { overflow : hidden; background: lightblue; text-align: center; } </style> </head> <body> <div class=”parent”> <h1> Nesting Div</h1> <div class=”child”> <h2>Child Div</h2> </div> </div> </body> </html> |
The following will help you to understand the HTML and CSS.

CSS Div Element Style Options
The following is a list of some possible styles for you to play with:

Div Element Alignment with HTML
With the Div element, you can align an entire block of code on your web page. This block can be anything you want in your web environment including images, tables, text, etc.
The following code sample is a simple display of the div element showing how you can easily control a block alignment using: middle, left, and right, to tell the web page how to align that section.
| <html> <head> <body> <div align=”middle”> <table width=”600″ border=”1″> <tr> <td width=”200″><p>This is the first column</p></td> <td width=”200″><p>This is the second column</p></td> <td width=”200″><p>This is the third column</p></td> </tr> </table> </div> <br><br> <div align=”left”> <table width=”600″ border=”1″> <tr> <td width=”200″><p>This is the first column</p></td> <td width=”200″><p>This is the second column</p></td> <td width=”200″><p>This is the third column</p></td> </tr> </table> </div> <br><br> <div align=”right”> <table width=”600″ border=”1″> <tr> <td width=”200″><p>This is the first column</p></td> <td width=”200″><p>This is the second column</p></td> <td width=”200″><p>This is the third column</p></td> </tr> </table> </div> </body> </html> |
The code that we want to observe is below:

The web result displayed as follows:
- align=”middle” table
- align=”left” table
- align=”right” table

Play with the code and use this simple HTML div alignment trick to align your images, text, and tables in a tightly wrapped and easy to use package.
Where to Next?
This introduction to Span and Div should provide a starting point for further inquiry into the unlimited creative aspects that HTML offers. We will continue to explore other areas of HTML design in the next blog. We hope this introduction has piqued your interest and inspired you to explore further and dive deeper into the world of web design.
Enroll in our Intro to Programming Nanodegree program today!

