Images are one of the most important aspects of a website’s visual power. CSS Sprites are a collection of images that are combined into a single file that an HTML document can access. These images are then called into use within the HTML code to be displayed on the website.
In this brief guide, you will learn more about the details of a sprite image and how it can be used to enhance your website. You will be provided code and output samples in this tutorial to help guide you through the use of CSS sprites.
If you need any refreshers on the basics of HTML or CSS, please take a look at HTML for Dummies and CSS Basics for Beginners to get caught up.
What is a CSS Sprite?
A CSS sprite is a collection of images set into one file. At first, that might not make sense as it would be difficult to get multiple images from just one file as image resolution and image overlapping come up as potential pitfalls.
Thankfully, that is not the case. A CSS sprite is a flat 2D image referenced by the positioning of the x and y coordinates that you specify. Many images can be referenced from the coordinate plane on the image through the use of a single sprite file.
By using a single file to call multiple images, the website does not have to make as many outgoing HTML requests. Additionally, the image size itself is smaller, resulting in less bandwidth usage by the site.
On smaller sites with low traffic, the image calls could be something barely noticeable. However, on larger sites with heavy traffic, this issue can have noticeable impacts on infrastructure directed for the site’s use. CSS sprites are a great option when trying to optimize the site performance.
How to Use a CSS Sprite?
Now that you know the “why” behind using a CSS sprite, you might be curious as to how you can use them in your work. First, you will need to have a CSS sprite image to work with.
Creating a CSS Sprite File
You can use various methods to create your own sprite files, such as adding multiple images using Photoshop, Gimp, or other image editing tools. You can even use free online services such as Topals’ Sprite Generator or Instant Sprite to handle the process. Once you have a set of images combined into one file, your image sprite is good to go. Note that the PNG format is noted as the common file type to use for CSS sprites.
The doodles below were created for the process.
All three doodled images were then edited into one PNG image to be used as a sprite. The combined images are shown in the example below.
Using the CSS Sprite File
Once you have the CSS sprite ready to go, you probably want to know just how you go about placing it on your webpage. Before you add the image to the page, you need to know what image you are going to use and where it is in relation to horizontal and vertical positioning. You also need a place to put that image once you have your details zeroed in.
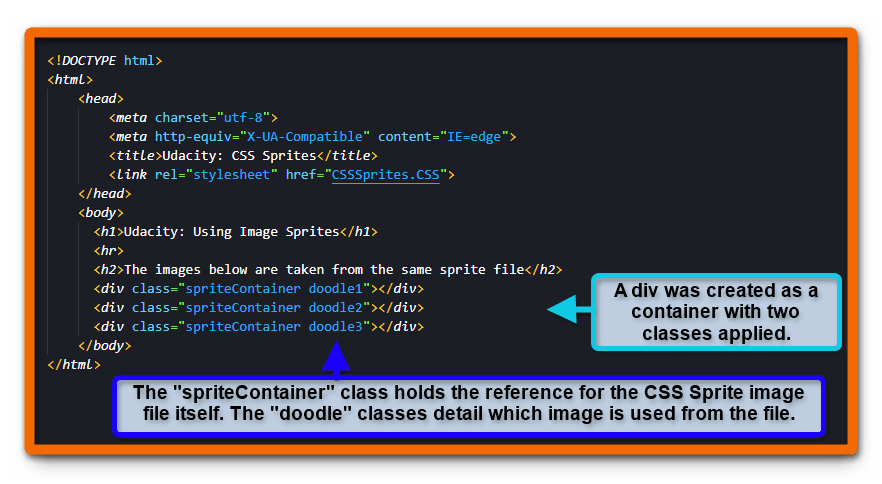
In the sample HTML code image below, you can see that three div element tags are placed within the body of the document. Classes are used to help with the CSS coding for the sprite images. If you are not familiar with using classes, please read over HTML/CSS Class and ID Selectors for a great walkthrough.
Each div has a class of “spriteContainer.” A second class is added into the divs as well. These secondary classes of “doodle1,” “doodle2,” and “doodle3” help to target the images from the sprite file. Remember that you can name classes as you choose. The naming conventions here are simply for ease of reference.
The following image below shows the basic HTML document code.
With the display work complete on the HTML document, the process now moves on to the CSS styling. In the CSS code below, you can see the class of “spriteContainer” has a background property set. The value used is the locally stored CSS sprite file made from the combined doodle images.
Setting the Sprite Image Positions
Next, the desired images have to be targeted from the CSS sprite file so they can be displayed on the page. Here is where the horizontal and vertical position values come into play. If you created your own CSS sprite file to test this process out, you might find yourself wondering how you would go about finding these values.
You can load the image file into editor tools like Photoshop to map out a grid. There is also the option of simply guessing the correct values with the trial and error process.
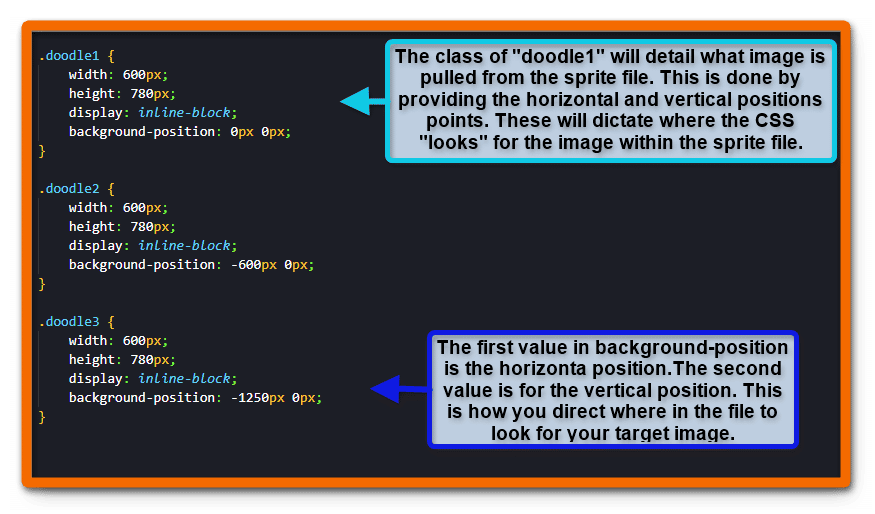
In the CSS stylesheet image below, each doodle class has values for the image display. The width and height are set first, along with the method of display. The inline-block value is used for the display to keep all images on the same block level with a modifiable height. The background-position value is where the target coordinates are set for the image you want.
The first value is the horizontal position. For the first image, the value is left at zero. If you reference the file, it is the first image on the left-hand side of the file. The next two doodle classes had the value moved over so that the other images are referenced instead.
The second value is for the vertical position. You might notice this value was not changed on any of the doodle classes. As there are only three images in the file, and they are all on the same x level, the value did not need to be altered.
You can see these steps applied in the sample CSS stylesheet below.
With the HTML and CSS code combined, you receive the following output on the page.
The browser has pulled the requested images from the single CSS sprite file and placed them within the specified areas of the HTML document. Using this method can feel odd as you are doing a bit more work to get the images ready. The payoff is the benefit to the overall performance of a site as it grows.
You can also reuse the image classes over again once they have been defined. Consider if you made a website for selling cars. You can use a bright red half-off sticker image wherever you want after the image class has been defined. You could also keep all the sale-type images in one specified CSS sprite file. This single file can then be used across any website you create. That modular approach not only saves you time as a designer but headaches as well.
_________________________________________________________________________
Why stop at just CSS and image work? Add in advanced programming skills to design your own future. The creativity of programming is allowing people to do even more with their ideas. If you want to advance your career, take the first steps by learning to code.
Having these skills can help you open doors to those new professional possibilities. Enroll in Udacity’s Intro to Programming Nanodegree today to start the journey.


