Forms are seen and used everywhere. Any time you want to purchase an item inline, look up bank information, or you’re simply requesting information from a web site, you will use a form of one kind or another.
For this tutorial, you will learn some straightforward form building techniques that you can customize and use for multiple applications. This tutorial will take advantage of CSS (Cascading Style Sheets) functions while creating the effect within the HTML (Hypertext Markup Language) page. Along the way, you will also be provided with some fun and creative design elements. All you need to start with is a simple code editor such as Notepad ++.
The Essentials of HTML Forms
The HTML <form> element is a container for a variety of different types of input elements. The most used input elements types are:
- text fields
- checkboxes
- radio buttons
- submit buttons
The <input> Element
The HTML <input> element is the most used form element due to the way web forms operate. Most forms simply want you to input data.
Depending on the type attribute, an <input> element can be displayed in many ways. Here are some examples:
- <input type=”text”> – Displays a single-line text input field.
- <input type=”radio”> – Displays a radio button (for selecting from a multiple choice list).
- <input type=”checkbox”> – Displays a checkbox (for selecting zero or more of many choices).
- <input type=”submit”> – Displays a submit button (for submitting the form when completed).
- <input type=”button”> – Displays an observable clickable button.
Creating the Form Using <input type=”text”>
Let’s set up the HTML page for a basic input for a first and last name entry.
The input type=”text” defines a text box.
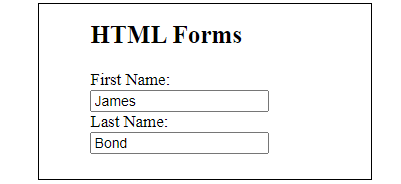
<!DOCTYPE html>
<html>
<body>
<h2>HTML Forms</h2>
<form action=”/action_page.php”>
<label for=”fname”>First Name:</label><br>
<input type=”text” id=”fname” name=”fname” value=”James”><br>
<label for=”lname”>Last Name:</label><br>
<input type=”text” id=”lname” name=”lname” value=”Bond”><br><br>
</form>
</body>
</html>
This is the browser result.
Now add a Submit button.
<!DOCTYPE html>
<html>
<body>
<h2>HTML Forms</h2>
<form action=”place where the form will be sent to”>
<label for=”fname”>First Name:</label><br>
<input type=”text” id=”fname” name=”fname” value=”James”><br>
<label for=”lname”>Last Name:</label><br>
<input type=”text” id=”lname” name=”lname” value=”Bond”><br><br>
<input type=”submit” value=”Submit”>
</form>
</body>
</html>
Clicking the “Submit” button will send the form-data to the page that you designate. Notice the <form action=”place where the form will be sent to”>. This tells the form what action to take once the Submit button is clicked.
This is the result in your browser.
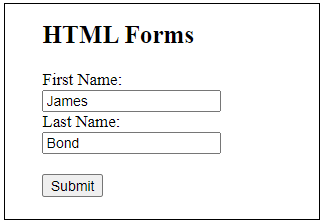
You now have a Submit button.
Creating the Form Using <input type=”radio”>
Let’s set up the HTML page for radio buttons.
The input type=”radio” defines a radio button.
<!DOCTYPE html>
<html>
<body>
<h2>Radio Buttons</h2>
<form>
<input type=”radio” id=”redwood” name=”wood” value=”redwood”>
<label for=”redwood”>Redwood</label><br>
<input type=”radio” id=”maple” name=”wood” value=”maple”>
<label for=”maple”>Maple</label><br>
<input type=”radio” id=”pine” name=”wood” value=”pine”>
<label for=”pine”>Pine</label>
</form>
</body>
</html>
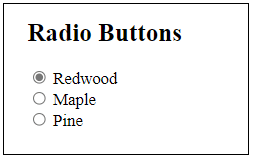
This yields the following in your browser:
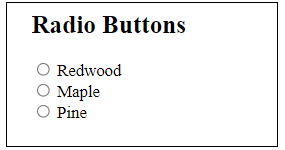
Now you have three radio buttons.
Notice that this line of code produced the actual name next to the radio button <label for=”redwood”>Redwood</label><br>.
Clicking on a radio button looks like the following:
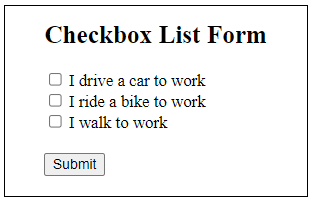
Creating the Form Using <input type=”checkbox”>
Let’s set up the HTML page for checkboxes.
The input type=”checkbox” defines a checkbox.
<!DOCTYPE html>
<html>
<body>
<h2>Checkbox List Form</h2>
<form action=”/action_page.php”>
<input type=”checkbox” id=”vehicle1″ name=”vehicle1″ value=”Bike”>
<label for=”vehicle1″>I drive a car to work</label><br>
<input type=”checkbox” id=”vehicle2″ name=”vehicle2″ value=”Car”>
<label for=”vehicle2″>I ride a bike to work</label><br>
<input type=”checkbox” id=”vehicle3″ name=”vehicle3″ value=”Boat”>
<label for=”vehicle3″>I walk to work</label><br><br>
<input type=”submit” value=”Submit”>
</form>
</body>
</html>
This yields the following in your browser:
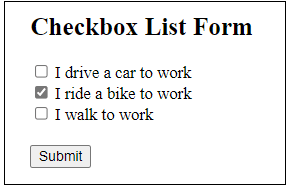
Checking a box looks as follows:
Final Note
Although discussing the infinite ways you can customize and beautify the forms is beyond the scope of this document, let’s show you a couple of easy examples.
Adding the following CSS into the HTML page will color the input names.
<style>
#lname{color: blue;}
#fname{color: blue;}
</style>

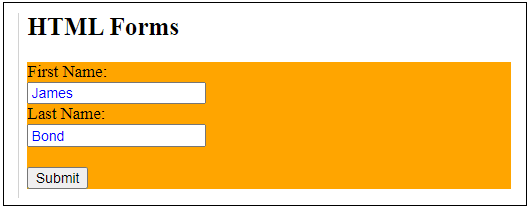
Adding div{background-color: orange} to the CSS style will give an orange background to your form as long as you encase the form with the <div> element.
<!DOCTYPE html>
<html>
head
<style>
#lname{color: blue;}
#fname{color: blue;}
div{background-color: orange}
</style>
<body>
<h2>HTML Forms</h2>
<div>
<form action=”/action_page.php”>
<label for=”fname”>First Name:</label><br>
<input type=”text” id=”fname” name=”fname” value=”James”><br>
<label for=”lname”>Last Name:</label><br>
<input type=”text” id=”lname” name=”lname” value=”Bond”><br><br>
<input type=”submit” value=”Submit”>
</form>
</div>
</body>
</html>
This produces the following output:
As you can see, the ability to control and design your own forms serve a variety of situations and applications. Play with the code and see what works for you in the environment where you want to use borders. In the end, always ask yourself the question, what is it that I want to do in order to best serve my website customer? Be creative in your layouts and don’t be afraid to play.
Where to Next?
This Creating HTML Forms introduction should provide a starting point for further inquiry into website design, layout, and practical applications with HTML and CSS.
Continue to explore other areas of design. The hope for this introduction is that it piques your interest, inspires you to explore further, and dive deeper into the world of web design.
HTML is a great way to start learning code, but the professional world demands more and more. Why not supercharge your skills and options by taking it even further. Enroll in our Intro to Programming Nanodegree program today!