When writing CSS to control the styles of an HTML web page, there are two ways to go about it. You can write the CSS styles to a specific element or group elements together with a specific style. Grouping CSS styles saves page space and allows you to apply particular styles to multiple tags.
For this tutorial, you will learn some straightforward CSS grouping methods that will transform the way you build CSS styles in your code editor.
This tutorial will take advantage of CSS (Cascading Style Sheets) functions while creating the effect within the HTML (Hypertext Markup Language) page. All you need to start with is a simple code editor such as Notepad ++.
The Essentials of CSS Grouping
In the traditional way of writing CSS, especially when you are new to coding different styles to be applied to your HTML, there is a tendency to list each item. Listing each item keeps things organized, but it also takes more space on the page. There is a concept called “clean code” that is important to remember. As you build your “house” of code to create your web page, you want to maintain the code by keeping it organized, structured, and also grouped when possible to minimize space.
Grouping Tags
You might want to list styles for your different levels of headings. In doing so, the CSS may look as follows:
h1 {
    color: orange;
    font-weight: 900;
    font-size: 20px;
    font-family: Arial, Helvetica, sans-serif;
}

h2 {
    color: blue;
    font-weight: 700;
    font-size: 16px;
    font-family: Arial, Helvetica, sans-serif;
}

h3 {
    color: orange;
    font-weight: 600;
    font-size: 14px;
    font-family: Arial, Helvetica, sans-serif;
}
Separating these out makes sense since you are creating different styles for each heading tag that are very unique. However, if you wanted to simply control color and font for specific tags, and you wanted them to all be the same, you can write the CSS in a grouping method. You need to make sure to add a comma between each tag.
h1, h2, h3 {
    color: orange;
    font-family: Arial, Helvetica, sans-serif;
}
This would give the heading 1, heading 2, and heading 3 tags an orange color with the designated font family. This takes up much less space.
Let’s set up a sample HTML page using our CSS example. What this will do is control the color and font, and nothing else. However, what you will notice is that the web browser automatically calculates the font size per the heading tags.
<!DOCTYPE html>
<html>
<head>
<style>
h1, h2, h3 {
    color: orange;
    font-family: Arial, Helvetica, sans-serif;
}
</style>
</head>
<body>
<h1>Top Level Heading</h1>
<h2>2nd Level Heading</h2>
<h3>3rd Level Heading</h3>
</body>
</html>
This is what the browser will show.

Grouping Id and Class Selectors
Not only can you group specific tags, but you can also group id and class selectors together. Always separate the list with a comma as you did previously with tags. Using the id and class selectors also helps to keep your elements in order. Keeping your code clean and organized will help secure a nice visual layout on your web page.
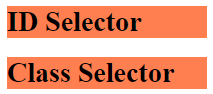
The following is a CSS example with the id #myDiv and the class selector .mySecondDiv.
#myDiv, .mySecondDiv
{
Width: 200px;
Background-color: coral;
}
In an HTML environment, this CSS would need to be paired up with some HTML IDs and Class selectors to showcase this in a browser.
<!DOCTYPE html>
<html>
<head>
<style>
#myDiv, .mySecondDiv
{width: 200px;
background-color: coral;
}
</style>
</head>
<body>
<h1 id="myDiv">ID Selector</h1>
<h1 class="mySecondDiv">Class Selector</h1>
</body>
</html>
The result will be the same because we are applying the background color “coral” with a width of 200px.
DIV Element
As you saw in the previous applications for grouping the heading tags and class and id selectors, you can also apply the grouping to div elements.
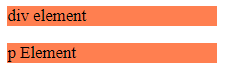
Imagine grouping both the div and p element.
The CSS in an HTML layout could look something like this:
<!DOCTYPE html>
<html>
<head>
<style>
div, p
{
width: 200px;
background-color: coral;
}
</style>
</head>
<body>
<div>div element</div>
<p>p Element</p>
</body>
</html>
This gives the following in a browser.
Final Note
Although you can always list your CSS styles individually, know that whenever you have the opportunity to group styles together, it saves space and compartmentalizes the selectors. Grouping keeps things organized.
However, it may be better in some cases to keep the elements separated so that you can add multiple styles. Grouping may end up overriding a style somewhere else in your code. You have to decide for yourself which direction to take.
Where to Next?
This Creating CSS Groupings introduction should provide a starting point for further inquiry into website design, layout, and practical applications with HTML and CSS.
Continue to explore other areas of design. The hope for this introduction is that it piques your interest, inspires you to explore further, and dive deeper into the world of web design.
HTML is a great way to start learning code, but the professional world demands more and more. Why not supercharge your skills and options by taking it even further. Enroll in our Intro to Programming Nanodegree program today!